The presentation of advertisements plays a crucial role in capturing the audience’s attention and maximizing …
The presentation of advertisements plays a crucial role in capturing the audience’s attention and maximizing revenue. With its user-friendly interface, WordPress is a popular choice for publishers looking to manage their content efficiently. However, when it comes to customizing the appearance of ads, many publishers may find themselves looking for ways to add a personal touch.
In this guide, we’ll explore the importance of custom CSS for ads and provide step-by-step instructions for publishers to integrate their own styles into WordPress ad spaces seamlessly.
Why Customize Ads with CSS?
Standard ad formats are effective, but customization can elevate the user experience and increase engagement. By adding custom CSS to your ads, you gain the following benefits:
Branding Consistency: |
Aligning ads with the overall aesthetic of your website maintains a cohesive brand image. |
Improved User Experience: |
Tailoring ad styles to blend seamlessly with your content, reduces the likelihood of ad fatigue among your audience. |
Higher Click-Through Rates: |
Well-designed, visually appealing ads are more likely to capture the audience’s attention, leading to increased click-through rates. |
How to Add Custom CSS in WordPress?
Customizing CSS can be done in multiple ways. You can use the built-in theme css customizer or you can make use of a plugin. We will discuss each method in detail below:
Method 1: Using Default Theme Customizer
In this method, we will use the default theme customizer from WordPress. Just follow these simple steps to add your custom CSS code.
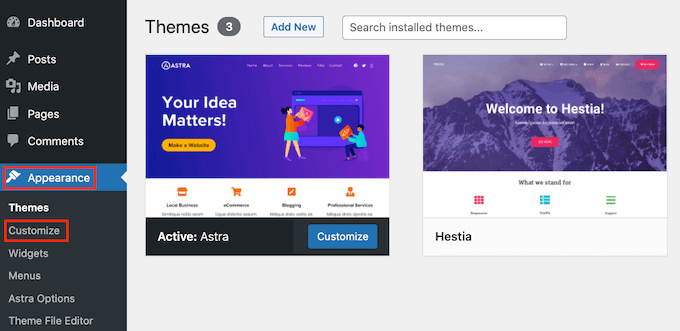
Step 1: Go to “Appearance” then “Customize” in your WordPress dashboard.
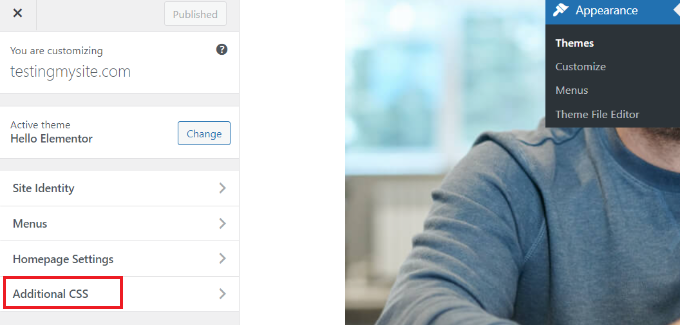
Step 2: Click the “Additional CSS” tab from the left panel.
Step 3: Paste your CSS code in the box available at the left panel.
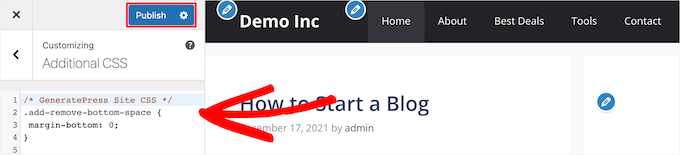
Step 4: You will see the changes in your theme. Publish after you place and test your code to implement it.
Method 2: Using WP Code Plugin (2+ Million Active Installations)
Another method is to use the WP Code plugin that will insert your code into your theme. For this, you need to follow these steps:
Step 1: Go to “Plugins” then “Add New Plugin” in your WordPress dashboard.
Step 2: Search for “WP Code” and click “Install” then “Activate“
Step 3: After activating the plugin, go to “Add snippet” on the “Code Snippets” settings available in the WordPress dashboard.

Step 4: Select the “Add your Custom Code (New Snippet)” option in the code snippets library and select “Use Snippet.“
Step 5: Next at the top of the page, write your snippet’s name and write or paste your code in the “Code Preview” box and set “Code Type” to “CSS Snippet” from the drop-down menu.

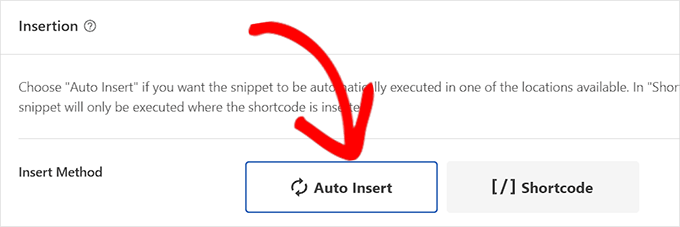
Step 6: Scroll down to the “Insertion” section and select “Auto Inserter” if you want to apply your code on your whole site or you can choose “Shortcode” if you’re going to execute it on specific areas.
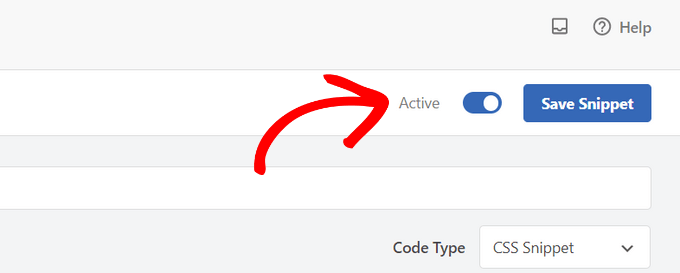
Step 7: Go back to the top of the page,, toggle the ” Active ” switch and click “Save Snippet“.
Method 3: Using Code Snippets Plugin (800,000+ Active Installations)
In this method, you use the Code Snippet plugin that will insert your code into your theme. To start customizing css code, you need to follow these steps:
Step 1: Go to “Plugins” then “Add New Plugin” in your WordPress dashboard.
Step 2: Search for “Code Snippets” and click “Install” then “Activate.“
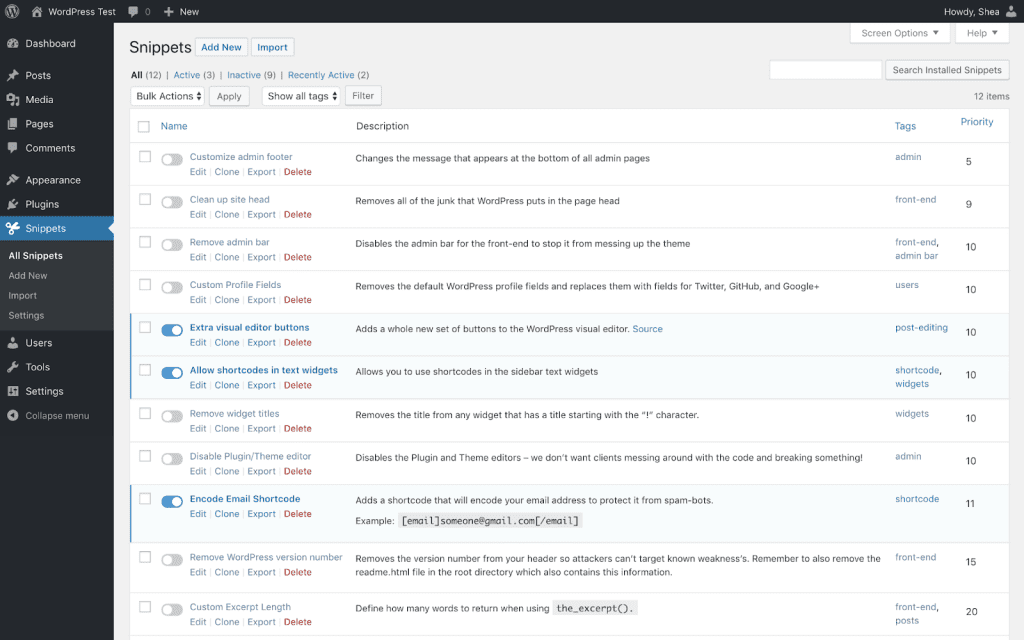
Step 3: After activating the plugin, go to “All Snippets” on the “Snippets” option available in the WordPress dashboard menu.
Step 4: Select the “Add New” option to create a new snippet.
Step 5: Next at the top of the page, write your snippet’s name, write or paste your code in the “Code” box, and select your desired option from the menu below.
Step 6: Add some relevant information in the “Description” box and add related tags (optional) in the “Tags” box.
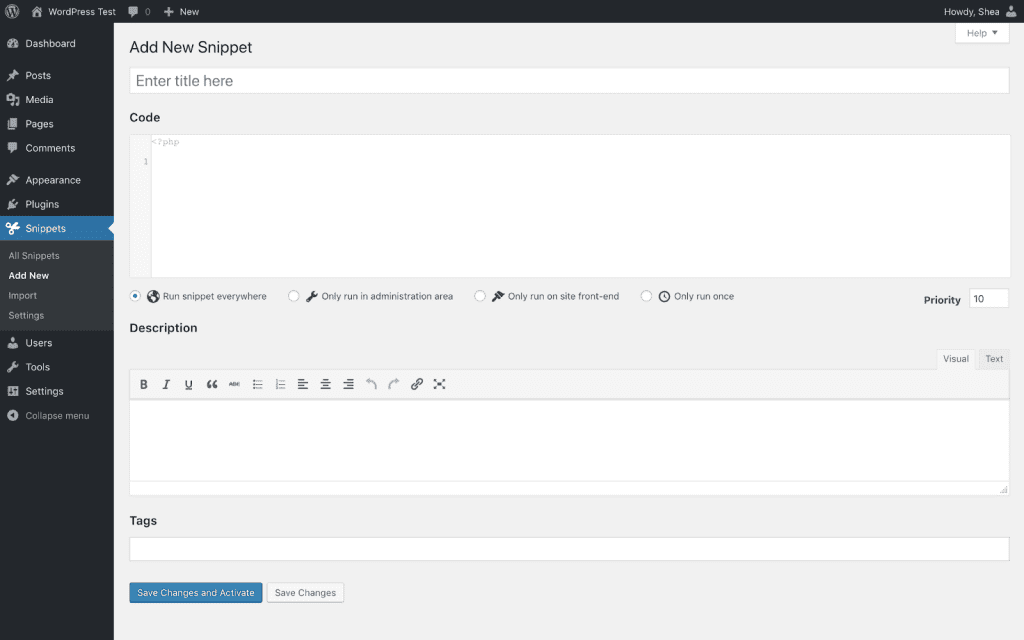
Step 7: Click the “Save Changes and Activate” button to apply your custom CSS code.
By following these above-mentioned methods, you can successfully insert your custom CSS codes into your WordPress website.
Have questions about Header bidding wrapper and price granularity?
Schedule a free consultation with our Header Bidding Expert today 📞